Inventory Adjustment
Inventory adjustments are required to:
- Correct inventory quantities, if the quantity in the Inventory Manager is different than the quantity on hand determine by a physical count. This type of difference can occur due to data entry mistakes when purchasing or selling inventory items or due to shrinkage.
- Correct inventory cost price, if the cost price in the Inventory Manager is different than the current cost price. This type of difference can occur due to data entry errors or due to a change in the market price for an item. The procedures for inventory cost adjustments are covered in the Post for 'Manage Inventory items'.
Inventory adjustments have accounting implications. By using the Inventory Adjustment module, you will be able to adjust either the inventory quantity or the inventory cost price and the appropriate G/L entries will be made automatically.
Content
Interface
To launch the Inventory Adjustment application, click on Inventory Adjustment in the Payable & Inventory group.
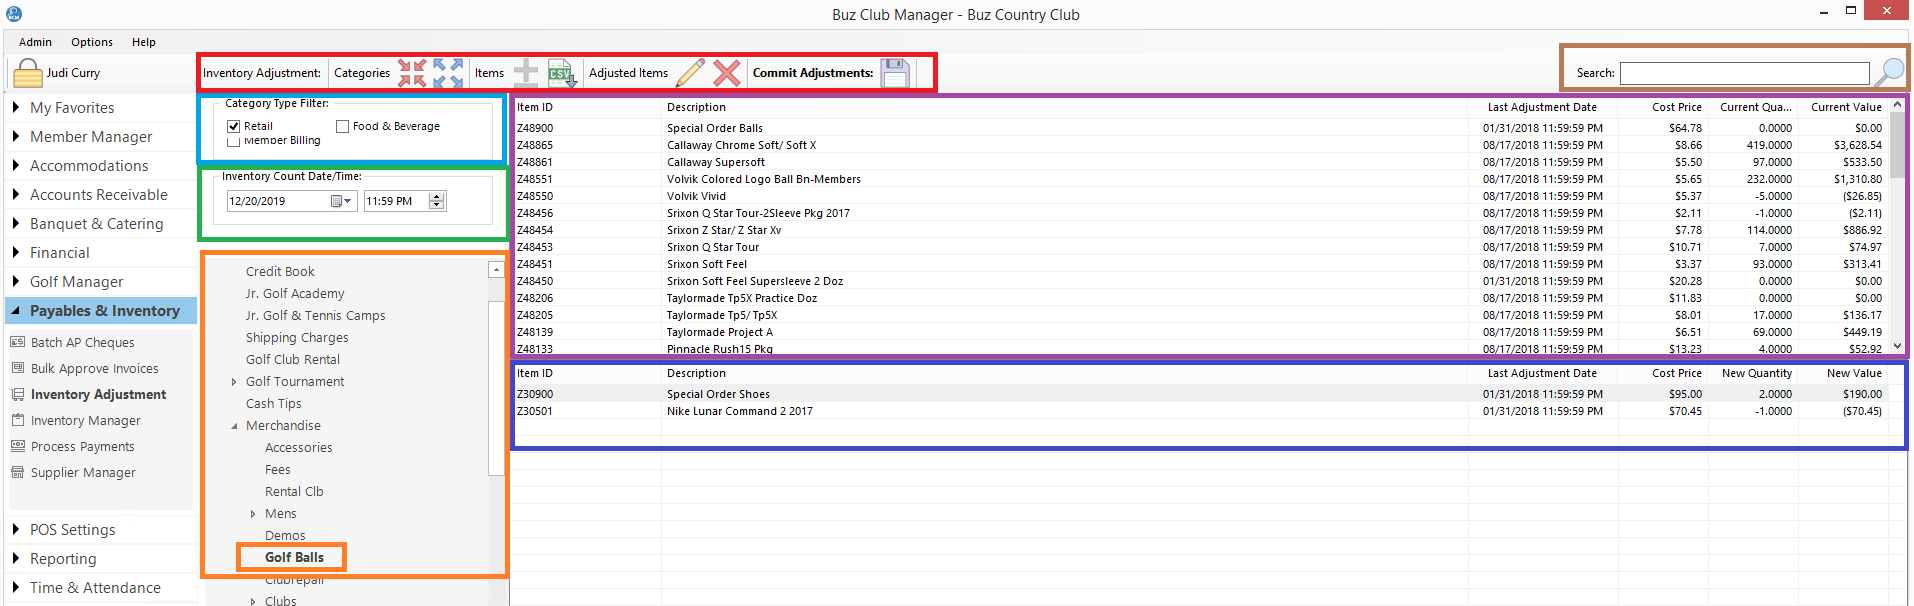
Tool Bar
The Tool Bar, outlined in red above contains buttons for:
- Category Expand All
- Category Collapse All
- Adjust Quantity
- Import Change List
- Edit Adjustment
- Delete Adjustment
- Commit Adjustments
Category Type Filter
The Category Type Filter, outlined in light blue, will filter the view of the Inventory Manager, outlined in orange below it, to display only the category types selected.
Inventory Count Date/Time
Inventory Count Date/Time, outlined in green, is the date and time of the inventory account.
Inventory Manager
The Inventory Manager, outlined in orange is a tree view which displays the categories and items to be selected for adjustment.
Inventory item List
The Inventory item List, outlined in purple is a list of the items available for adjustment which are in the category which has been selected in the Inventory Manager.
Adjustment List
The Adjustment List, outlined in dark blue, lists all of the items which have been provisionally selected for adjustment
Search
The search box, outlined in brown, will quickly find all items, based on the item description you enter.
Manage Adjustments
Bulk Adjustments
The recommended way to process inventory adjustments, is to upload a csv file with the desired inventory adjustments. The file requires at a minimum, 2 columns, which are the ItemID or SKU of the item and the count.
Step 1: Upload Adjustment File
To upload the file for adjustment, click on the ![]() the Tool Bar.
the Tool Bar.
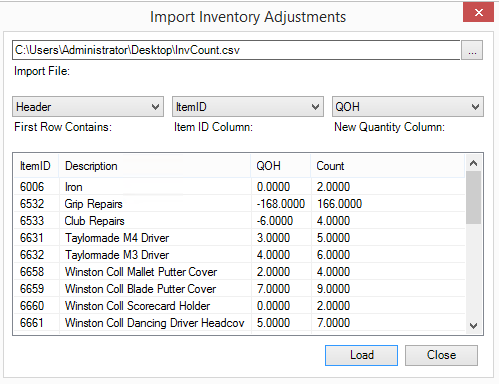
- Select the file which contains the inventory count
- Complete the First Row Contains field
- Map the item ID column and the New Quantity Column.
- Lastly, click on Load
Step 2: Set the Inventory Count Date/Time

Step 3: Review Adjustment List
Review the Adjustment List in the lower panel, outlined in dark blue above. Any problem lines will be highlighted in red. You can edit or delete a line item by right clicking on the line or by clicking on the line and selecting the edit or delete buttons from the Tool Bar.
Step 4: Commit Adjustments
Click on the the Commit Adjustments button on the Tool Bar to finalize the adjustments.
Individual Adjustments
You can adjust the quantity on hand for one or more items, directly from the application by following the steps below:
Step 1: Find and Select the Item
You can find and select an item in one of two ways.
- Using the Search Box, type the description of the item. The Inventory Item List, outlined in purple above, will populate, based on the criteria in the Search Box
- Using the Inventory Manager tree view, outlined in orange above, navigate to the category which contains the item you wish to adjust and then clicking on the category. The Inventory Item List will populate with all of the items in the category.
Step 2: Add Item to Adjustment List
To add an item to the Adjustment List, click on the item in the Inventory Item List and then click on the Adjust Quantity button on the Tool Bar or right clcik on the line and select Adjust Quantity
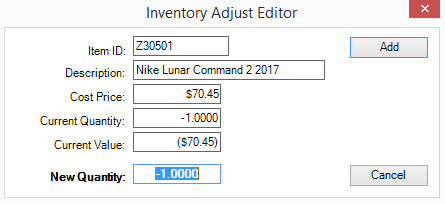
Enter the value for the New Quantity and then click Add.
Repeat steps 1 and 2 as required.
Step 3: Review Adjustment List
Review the Adjustment List in the lower panel, outlined in dark blue above. Any problem lines will be highlighted in red. You can edit or delete a line item by right clicking on the line or by clicking on the line and selecting the edit or delete buttons from the Tool Bar.
Step 4: Commit Adjustments
Click on the the Commit Adjustments button on the Tool Bar to finalize the adjustments.
Adjustment History
You may view the adjustment history for a selected item by right clicking on it in the Inventory Item List or the Adjustment List.
The following window will appear:
