Billing
Managing Billing is comprised of three different functions:
A billing record is an instruction to bill one or members based on a common rule. For example, you may want to bill all members in a specific member category for their annual dues.
Create a Billing Record
From the Tool Bar click on the Add Billing Item button to launch the Master Transaction Editor.
![]()
Complete the form using the instructions below as a guide:
- Inventory Item. Click on the button to the right of the field and select the applicable inventory item using the Inventory Item Selector.
![]()
- Profile. Always set to Member Billing.
- Start Date. This is the date that the Billing Record will be posted to the members' accounts. If the Billing Record provides for installments, the Start date, will be the date of the first installment.
![]()
- Free Form Description. This description is for internal use and will not appear on a member's statement. Make it as verbose a necessary to make sure it can be understood. See the example in the image above.
- Interest Rate. If the Item to be billed attracts interest, enter the interest rate in this field.
- Principal Amount. The amount is determined by the selling price in the Inventory Manager and cannot be changed here.
- Installment Frequency. Select the applicable installment frequency. If this is a single installment billing record, any installment frequency will be fine.
- Number of Payments. Select the number of payments if this is an installment billing, otherwise, select 1.
- Due Date. Select either Beginning of Period or End of Period. This only effects interest calculations. If the setting is Beginning of Period, then the calculation of interest commences as of the Start Date; If the setting is End of Period, then the calculation of interest commences as of the one period prior to the Start Date. For example, if the Start Date is June 1 and the frequency is monthly, then the End of Period setting will cause interest to be computed from May 1.
- Applies To. Select either Member Based, Category Based or Query Based.
- A Member Based billing record, will bill a single member. This feature is useful, if the billing record only applies to a single member, as in the example of a new member initiation fee.
- A Category based billing record will bill all members in a specific member or golf category.
- A Query based billing record will allow for a more complex billing rule using a query which has been created in the Query Manager.
- Next select the applicable member, category or query.
![]()
- Amortization Payment Schedule. This will display the amortization of the Billing Record.
Once the form is complete, click Save.
Uploading an Externally Created File
Import File Structure
The billing import file contains 3 columns and as many rows as required. A header row is optional.
The file structure is as follows.
| Column | Field | Comments |
|---|---|---|
| A | Club ID | The Club ID is the member account number |
| B | Inventory ID | This the ItemID (case sensitive) assigned to the inventory item to be charged to the member. The The value for the inventory id can be found in the Inventory Manager |
| C | Charge Amount | This values can be positive or negative and contain up to two decimal places. Negative values are preceded with a minus sign. No currency signs or commas should be included. |
Import Billing Records
To import a billing file, launch the Billing Manager then click on the Import Billing Records button on the Tool Bar.
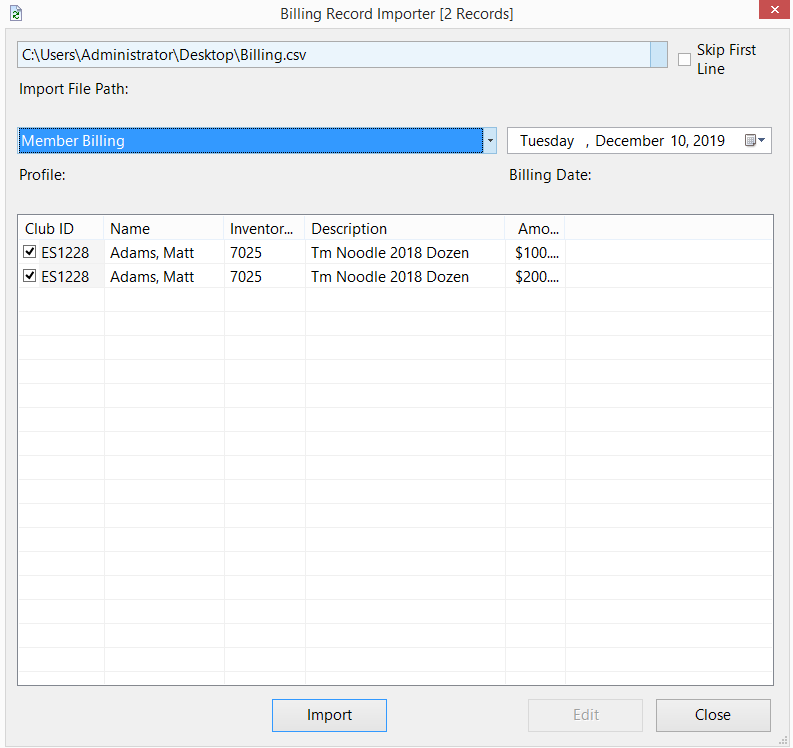
- Import File Path. Select the file which contains the Billing Records by clicking on the button to the right of the field using the standard Windows dialogue box.
- Skip First Line. If the import file has a header row, check off this box, otherwise leave it blank.
- Profile. Select the Point of Sale profile associated with the Billing File.
- Billing Date. Select the date that the Billing Records are to be charged.
Once the file is loaded, all records should be in a black font and the check box beside each row should be selected. If the system detects an error in a billing record or the amount exceeds $10,000, the line will appear in a red font and the check box will be disabled. You can enable the processing an item which exceeds $10,000 by checking the checkbox. Lines which have an invalid ItemID or ClubId cannot be imported and will have to be fixed using the instructions below.
Fixing Errors
Errors can be fixed by clicking on the line item which you want to correct and then selecting the Edit button at the bottom of the form. The Billing Record Editor will load:

Correct either the member to be charged or the inventory item to be charged by clicking on the button to the right of the applicable field. Once the record has been corrected click Save. If the correction was successful, the record will appear in black and the check box will be enabled.
Last click: Import. All of the Billing Records will disappear when they have been successfully imported.
Click Close to exit.
To post Billing Records (created using the Billing Manager or imported from a spread sheet file), launch the Billing Manager.
Click on the Post Billing Transactions button on the Tool Bar ![]() .
.
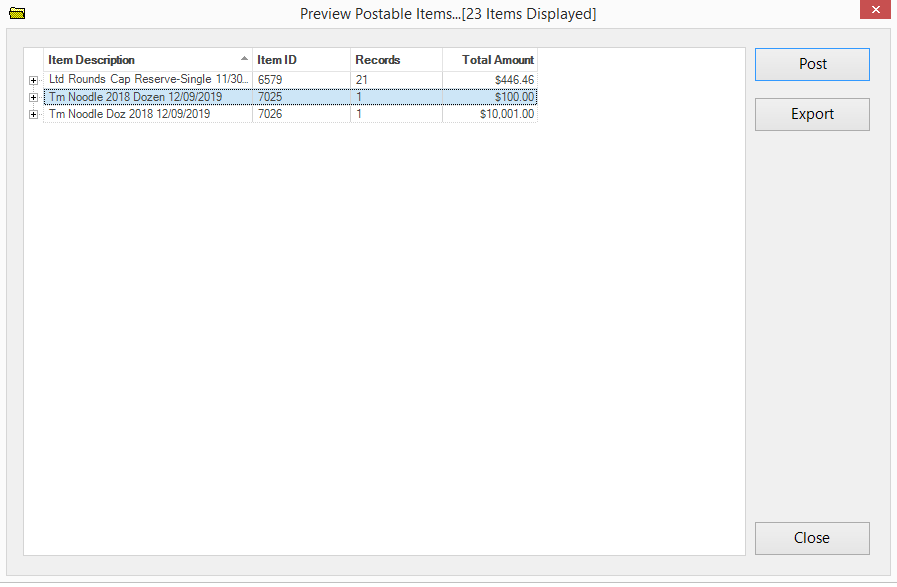 It may take several seconds for the list of charges to load, depending on the number of Billing Records to post. Peruse the list or click on the Export button to export the list to Excel for a more in depth review. You can expand each record to see the list of affected members by clicking on the + beside the record. When satisfied, click Post. Once the posting is complete, click the Close button.
Note: All Billing Records which are unposted and dated prior to the system date will be posted. Billing records dated on the system date cannot be posted until the following day (subject to the settings in the setup).